If you want to implement comment functionality into the news pages in SharePoint Server 2010, a no code solution with Data Views and portion of jQuery could be a perfect option for you. Alternative you can use the OOTB Note board web part or even use a blog site to get comment functionality but these options limits you if you need to customize such solution in comparison to data views powered with XSLT, jQuery and CSS.

My concept for this is basically to use two connected lists. In the following example I’ll use the Page library in the root site and a custom list called NewsComments. The NewsComments lists have a lookup column (PageID) that connects the ID column in the Pages library. You can do this at a news sub site as well if you prefer.
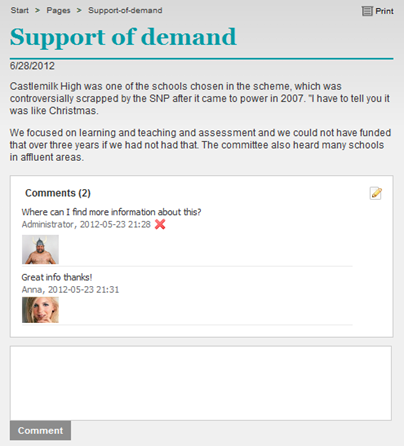
I am using a data view form web part for the comment textbox in a page layout that sends the comment text, the current page ID, the page title and the page URL to the NewsComments list. Into this Page layout that serves as a template for the news pages, I have created a DVWP that displays all comments related to the current page. Do get this relation I use a parameter with a server variable and a XSL filter that matches current page name to the column in NewsComments list that stores the page names. I do also use some jQuery to grab and populate information on the page and the list.
When you connecting lists with a lookup it gives you the possibility to join content from both lists in a Data View Web Part (joined subview), this can also be useful if you want to create a news rollup that shows the latest news including the number of comments per news item. I’ll write more about such web parts in the next blog.
First step – create the list and a page layout
-
Create a list in the root site of the site collection by the type of Custom List named NewsComments. Create following columns:
- A column named PageID by the type Lookup. Select Pages in ’Get information from’ and select ID for ’In this column’. Set it to required and click OK.
- A column named PageTitle by the type Single Line of Text and click OK.
- A column named Comments by the type multiple lines of text with 5 rows, specify this as Plain text and click OK.
- Open SPD and create a new page layout and give it the name ’NewsPages’. Don’t forget to give the file a Title. You can copy an existing page layout. Open the page and add or remove the content fields you like the page to have, you can use just Page Content and Title. Add some additional markup; give the elements class names that the jQuery functions needs. Download my example files down below and copy the markup. In my example I have created a Page layout based on the Article Page layout, if you are using a content type like the Enterprise Wiki you have to add tag prefix in the top of the page layout that match the fields you put on the page.
- Save and publish the file in _catalogs > masterpage folder at the root site. Make sure that it’s available at the root site as a selectable page layout so you can specify this page layout when you create a new page in the root site.
- Now use the browser and create some pages at the root site, for example name the first on to test1 and the URL will be /Pages/test1.aspx. Use your new page layout as template.
Next step – create a comment in the list
Open the NewsComments list and create a new item, type the URL name of one of the pages you have created in the tile field, for example test1.aspx. Type the filename of the page in the Title field, select the ID of this page, type the title of the page in the PageTitle column and create a comment. You’ll need to do this just to make sure the comments can be connected.

You have now created the basics and were now move the two DVWPs that will display the comments for the pages and make the comment box available. Download my example files if you get stuck, you can just copy the DVWPs and the jQuery and paste them in your page layout.
Next step – create a Data View Web Part that only display comments related to the current news page.
- Open SPD and the page layout that you just created with SharePoint Designer. Create a DVWP (display Item Form) that get the information from the NewsComments list. Add this DVWP at the bottom of the page just below the last content field. Use no paging, show all objects and show only the column Comments.
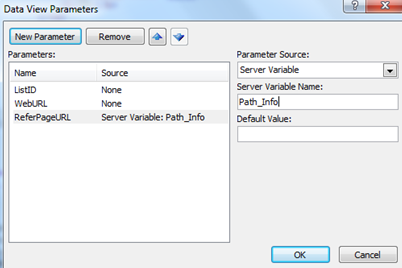
- Create a new parameter as in the image below. The parameter is required to match the current page’s URL name to what caught up in NewsComments list’s Title field.

-
Change the dsQueryRespoinse/Rows variable. If you have a language other than English don’t forget to change name of Pages. Locate the following line:
<xsl:variable name="Rows" select="/dsQueryResponse/Rows/Row"/>
change to:
<xsl:variable name="Rows" select="/dsQueryResponse/Rows/Row[@Title=substring-after($ReferPageURL, 'Pages/')]"/>
- Save the page and verify that only the comments appear per page according to what you entered in the NewsComments list.
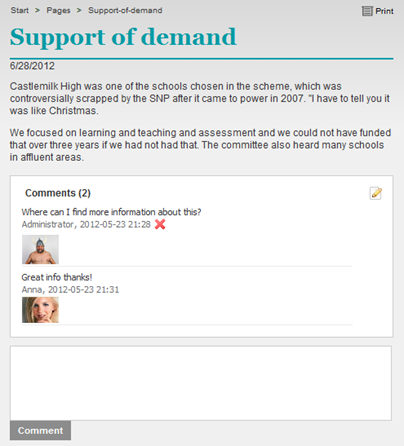
- Clean up the DVWP, och add the some markup for presentation.
- Verify that everything works so far.
Next step – create a form web part
- Add a DFWP (New Item Form) below the other data view, that get the information from the NewsComments list.
- Use only following columns: PageID, PageTitle, Title and Comments
Clean the DFWP and give it some markup. As for the other DVWP, it’s important that you use the appropriate markup when jQuery and CSS makes use of class names.
Next step – create the jQuery you need for the comment box in the page layout
The purpose of the following jQuery is to get the page’s ID populated in the dropdown and to populate the Page’s title and URL into the select fields. I have also included a function that show characters left and set a limit to 140 characters.
<script type="text/javascript">
// Limit characters
function limitChars(textid, limit, infodiv){
var text = $('#'+textid).val();
var textlength = text.length;
if(textlength > limit) {
$('#' + infodiv).html(''+limit+' limit reached');
$('#'+textid).val(text.substr(0,limit));
return false;
}
else {
$('#' + infodiv).html(''+ (limit - textlength) +' characters left');
return true;
}}
$(function(){
$(".FormFieldNewsComments > span > textarea[title='Comments']").keyup(function(){
limitChars(".FormFieldNewsComments > span > textarea[title='Comments']", 140, "LimitInfo");
})
});

$(document).ready(function() {
var loc = window.location.href.substr(window.location.href.lastIndexOf("/")+1); // Get the page filename
var PageTitle = $('.PageTitleDiv').html(); // Get the page title
$(".FormFieldNewsTitle > span > input[title='Title']").val(loc); // insert page filename in a CSS hidden formfield
$(".FormFieldPageTitle > span > input[title='PageTitle']").val(PageTitle);	// insert pages title in a CSS hidden formfield
var HiddenInput = $("input[title='PageID']").attr("optHid"); // Lagrar ID till attributet optHid
$("select[title='PageID']").val(_spPageContextInfo.pageItemId); // If less than 20 items i Pages bibl, lägger in ID nr som en selected i DD
$("input[title='PageID']").val(_spPageContextInfo.pageItemId);  // If 20 or more items in Pages lib
$("input[id='" + HiddenInput +"']").attr("value",(_spPageContextInfo.pageItemId)) // Set ID as selected if 20 or more items in Pages lib
});
</script>
Next step – add a few more functions
I added a few additional functions in this example which I think may be helpful and that is the ability to remove own comments and to show number of comments for the page. If you download my example files, this is already included in the DVWPs.
Show the number of comments
<xsl:if test="count($Rows) = 0">No comments yet..</xsl:if> <xsl:if test="count($Rows) = 1"><xsl:value-of select="$dvt_RowCount" /> Comment</xsl:if> <xsl:if test="count($Rows) >= 2"><xsl:value-of select="$dvt_RowCount" /> Comments</xsl:if>
Add the following parameter to your XSL style sheet
<xsl:param name="UserID" />
Create these parameter for the rowview template
<xsl:param name="KeyField">ID</xsl:param>
<xsl:param name="KeyValue" select="ddwrt:EscapeDelims(string(@ID))"/>
<xsl:param name="Mode">view</xsl:param>
Match the author to the logged in user
<xsl:if test="@Author.title = $UserID">
<a href="javascript: {ddwrt:GenFireServerEvent(concat('__cancel;__delete={',$KeyField,'=',$KeyValue,'};__commit'))}">DELETE</a>
</xsl:if>
If you want to create a link to the comment list that only administrators should see you can use the DDWRT:IfHasRights() function with an appropriate value
<xsl:if test="ddwrt:IfHasRights(33554432)"><a href="/Lists/NewsComments/AllItems.aspx"><img src="/Style Library/Branding/Images/EditIcon.gif" alt="" /></a></xsl:if>
Next step – branding
The functions for this are now completed and it’s time to give this some visual awesomeness! Download my example files where you find CSS and an image that should get you going.
More to do
There are a lot of things to keep in mind to get this up and I hope you can take this as a base for your own solution and find inspiration. There are many ways to extend this and maybe I’ll publish this to Codeplex for the support and possibilities to further extensions. Maybe it could be an idea to integrate this function with my friend Marc D Anderson’s SPservices SocialDataServices
Download the files
Download my example files here
Part II
In the next blog I’ll show you how to create a news rollup out of this, a joined DVWP that displays the latest news and the number of related comments.

Very nice blog post! Thank you for the sample code as well. I like the intensive usings of xsl and sharepoint’s data view and data form webparts. By the way, why not to use ootb notes instead a custom list as a comment store?
Hi Anatoly, thanks! The ootb notes is fine for comments, the difference in my example is the connection of two lists so you can for example create joined dwps for news rollups nr of comments or an most commented web part etc, I’ll write more about that in pt II. I recommend the notes as an first option if it’s good enough, and I hope this example could be an option if you need the posibilities that the list connection gives.
/ c
Superb Post !
Interesting, thanks for allowing the community to download your example files, and for sharing this information.
Christian,
Fantastic post (this and part II)… One thing I am curious about though… and this can pertain to both commenting on news articles or blog entries, etc… Once a user submitts a comment, how can we have the author of the article / blog post be notified (via email for example)?
Your posts are very useful – clear and concise – keep up the good work!
Thanks!
Can this be used in a sharepoint public facing site?
Hi, yea Shola you should be able to use this for a public facing site as long as you allow anonymus users to write in the comment list.
This is another awesome tutorial by Christian. I do have a quick question though. I’m getting scripts errors related to the limitChars function. It seems it’s not passing the dom as an object (altering textid.length always gives 58). I’m using the latest version of jQuery. Any thoughts?
Thanks!
Hi, Kevin great to hear you like the solution! It should work with the version I used in this blog, 1.7.1, try that first, otherwise if it’s something that needs to be rewritten for the latest jQuery I’ll look into that later on. Do also use IEdevToolbar to be sure that the markup for the comment textbox is comparable to the current jQuery for this function, it’s based on that the textarea is a multiple textbox with the type of ‘plain text’, not rich text.
/ C
This is exactly what I’m looking for for an intranet application. Displaying the comments, the comments field, and populating the hidden fields works great up until submitting a comment, and then a ViewState error is thrown and nothing is written to my comments list: “Sys.WebForms.PageRequestManagerServerErrorException: An unexpected error has occurred.” And in the event log: “Failed to load viewstate. The control tree into which viewstate is being loaded must match the control tree that was used to save viewstate during the previous request.” Any ideas on this one?
Hi KJ, don’t know what’s needed to be done from that description.. It was a time since I wrote this post, but be sure to follow every step exactly (there’s a bunch of steps..) Btw what about if you try to disable the viewstate, does that solve this issue? However that is perhaps not the solution that fits you but anyway? By default ViewState is turned off. Try to put EnableViewState=”true” (or try with false as well) in your aspx page (Page directive) and put EnableViewState=”true” in the ContentPlaceHolder like PlaceHolderMain. Sorry just some guesses without trying, but maybe this could help you?
Setting it to “false” gets rid of the error but then the form doesn’t submit any data unfortunately.
Thanks for the tips. I’ll try some experiments with enabling/disabling viewstate and get back to you.
Ok yes I see, thanks for getting back here about this. At the moment I’ve no SP 2010 to test this out my self so I wish you best of luck and as always it’s much about testing & learning.
Oh, I am doing this in SP2013 – would that pose a problem?
Oh, really I’ve not tested this in 2013, but now I will do that! Btw actually I’ve created news comments similar to this for a SP2013 onprem but then I used display templates and REST instead of the old good dataview. Same same but different.. Let me come back KJ.
I would be interested in seeing your 2013 version w/REST and display templates tutorial too if you ever put one together. The funny thing is that I had the comments submitting OK when I first started building this based on your code samples. Mine is slightly different: I’m using a CQWP to show headlines from an Announcements list. When the user clicks a headline it passes the announcment/news ID into another page that has a CQWP that displays the full article based on the ID in the querystring. So for comments, instead of using page IDs like you, I’m connecting them with the announcements ID. Once I had the comments for each story displaying correctly and dynamically, I went back to test the comment submission and then I had errors which suggests there is something in my modified code that broke.